Page 0: Welcome!
The information under this tab aims to provide new users with information about how I (Richard) go about doing database business. The information presented here is specific to the files I've designed and doesn't reflect how other designers might possibly go about using FMP's wonderfully versatile toolset.
For information about how FileMaker Pro in general works, you should consult FileMaker's own documentation (under the FMP Help menu) and website. I also want to put in a plug for O'Reilly Publishing's FileMaker Pro: The Missing Manual by Susan Prosser and Stuart Gripman.
Suggestions for improving this information are always welcome. Leave a comment at the bottom or e-mail me directly to let me know what you think.
Page 1: Contents
This table of contents will help you jump quickly to particular topics of immediate interest, in case you don’t want to proceed steadily thru the intro.
Pages 2-8 are semi-technical. End users (who won’t be fiddling with file structure or design) may wish to begin with Page 9.
Page 2: Definitions of common database terms
Page 3: Files and tables
Page 7: Relationships
Page 9: Color-coding conventions for fields
Page 10: Buttons
Page 27: Standard info lines
Page 28: Portals (windows into other tables)
Page 30: Standard colors
Note: Clicking on an illustration will jump you to a larger version of it.
Page 2: Definitions of common database terms
These important terms will be used thruout this intro:
File: A bloc of related data, stored as a single unit under a single name with a single end-of-file marker, for purposes of internal computer organization. There are 4 general classes of files:
- System files — allow the computer to run, keep track of where everything is stored, interface with external devices, etc. They make use of ...
- Resource files — fonts, screen rasterizers, sound generators, dynamic link libraries (DLLs), etc., which provide a common set of features that don't have to be reinvented by ...
- Programs (AKA applications or software) — files that “do things”, specifically allow the user to create original material, which in turn is stored in ...
- User files — word-processing documents, spreadsheets, songs, pictures, e-mail, web pages, drawings, and of course databases.
Entity: A collection of related things which are similar in nature. Examples: people, organizations, addresses, events, money, awards, buildings, cities, inventory.

Table: A single bloc of related data about an entity, formally structured for purposes of logical database organization. Typically, the table name corresponds to the entity whose information is recorded in that table (for example, People or Parts).
Page 3: Files and tables
So file is a computer term, whereas table is a database term. Up thru FileMaker Pro 6, the 2 terms were used pretty much interchangeably, because every file contained exactly 1 table, and every table needed exactly 1 file to hold it.
Here, for example, is what a typical database system might have looked like in FMP 3, 4, 5, or 6:
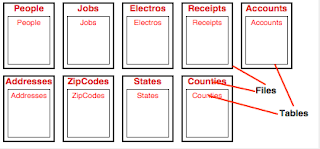
You may find yourself wondering “What the heck are electros?”. They’re electronic means of communication, and I'm fudging a little bit here. Back in the days before FileMaker Pro 7, such a file would have kept track just of phone numbers (and been called simply Phones), but now we also track eddresses and websites, so I'm retroactively using the more inclusive term Electros.
Page 4: Multiple tables per file
However, beginning with FileMaker Pro 7, it became possible for a single (computer) file to hold more than 1 (database) table. While this is possible, it’s not required.
Here, for example, is what the typical database system from the previous page might have looked like if it had been originally designed in FMP 7:
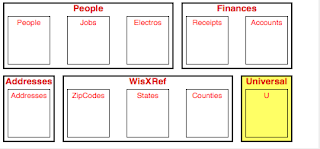
Note the presence above of a new file, Universal, which is designed to hold values common to the entire database system, like the name of its owner, the company logo, color swatches, and standard information like signature lines of the group’s agents (that is, its owners, board members, employees, or volunteers).
Page 5: The "F" table
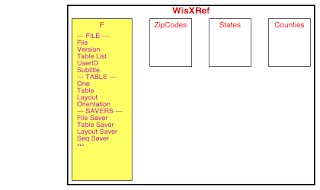
Just as Universal (abbreviated U) contains info for the entire system, we have adopted the convention of including within each file a table called simply F, which holds values that are common to that particular file and which occur only once in the file, such as the File name, Saver fields to keep track of what layout or record you were on, Default values to be auto-entered in newly created records, and so on.

Page 6: Standard fields
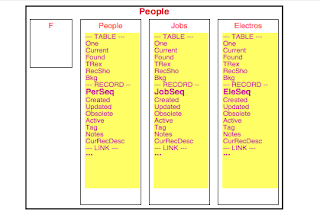
And these conventions continue down to the next 2 levels as well, with standard fields at the beginning of each table to hold information specific to that table (such as a display line about number of records and print orientation or a background hilite color field) and also information about each record (such as its unique Sequence number, dates Created and Updated, a Tag checkbox to allow you to create temporary groups of records, and a Notes field).
Page 7: Relationships
In a well designed database system, you will enter any given datum only once. Thereafter, any time you need that datum, you will be able to get it by following a trail from wherever you are to wherever that datum is stored. You create those trails yourself. They’re called relationships, and they typically involve a field in one table being exactly equal to a corresponding field in a different table.
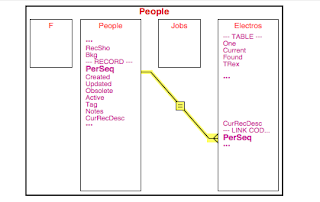
In the example above, the PerSeq field in Electros is related to the PerSeq field in People so we know whom the phone number (etc.) belongs to.
The tripod or “crow’s foot” connector at the Electros end of the relationship indicates the “many” end of a “1-to-many” relationship. This means that any given person can have many phones (or eddresses or websites), but each phone number is associated with only 1 person.
Page 8: E-R diagrams
We use entity-relationship (E-R) diagrams to illustrate how different tables in a database system are linked to each other. Boxes represent entities, and lines represent relationships between them. A given entity (table) may occur more than once in an E-R diagram, as for People in the diagram below.
I have adopted the convention of every table having a One field (a calculation field exactly equal to 1), so that it can be used to connect any record in one table to every record in some other table. In particular, I want every record in every table in the system to be able to get at the values stored in the Universal (U) file.
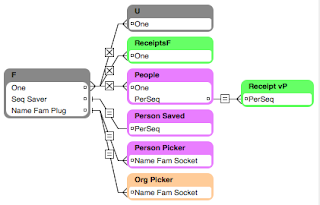
I have also adopted the convention of assigning the same color to all the boxes that represent any given table. In the above diagram, all the purple boxes represent the People table (alliterative mnemonic: purple –> person), the orange one is for the Orgs (organizations) table (alliterative mnemonic: orange –> org), and the green ones are for Receipts (non-alliterative but still evocative mnemonic: green –> money).
In more recent systems, People and Orgs have been consolidated into a single Beings table (mnemonic: blue –> being).
In addition to each table requiring a unique name within its own file, I have adopted the convention, wherever possible, of giving each one a unique initial that I can use as a shorthand method of referring to it. For example, Receipt vP means the Receipts table accessed via ("v") the People ("P") table.
Page 9: Color-coding conventions for fields
Places in this database system where you can enter data are called “fields”. You enter a field by clicking in it. You move from one field to the next by hitting the tab key. If you overshoot, back up by holding down the shift key while tabbing.
On data-entry screens:
- You must manually enter data in the blue fields, and you can change those any time you feel like it.
- A reasonable guess about what you’re likely to want will be pre-entered in the aqua fields, but you can change it if you want.
- Stuff in the green fields is entered automatically, and you can’t change it directly, tho you might be able to affect it by changing some other field. For example, the calculated field Active gets checked or not depending on whether there’s a date in the Obsolete field.

Page 10: Buttons
This database system makes extensive use of clickable buttons, and we’ve tried to standardize their appearance and functionality, as the next several pages will discuss. But first ...
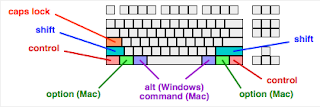
Remember these modifier keys:
- caps lock
- shift
- control
- option (Mac)
- alt (Windows)
- command or ⌘ (Mac)
Often the action performed by a button can be altered (usually exaggerated) by holding down a modifier key (except caps lock) when you click on it. For example, whenever you see that accent mark (`) on the Router` button, it means you can hold down a modifier key while clicking on it to go directly to the main data-entry screen in whatever file you happen to be in.

To remind you of this, we’ve set up “tooltips” that will appear for a few seconds if you hover your cursor over the button, as shown above with the Router` button. It tells you what’ll happen with a simple “Click” and also what’ll happen with a click “+Mod”.
Page 11: Color-coding conventions for buttons
Buttons are color coded based on the type of function they perform:


Below are the standard buttons that appear at the top of every data-entry screen in every file in the database system:

The next several pages in this introduction will discuss them 1 at a time.
Page 12: Create` button

Clicking on the Create` button will normally create a new record. Sometimes it will do so directly; at others, you’ll be taken to a screen where you’ll be asked for more information before the record is created.
If you hold down a modifier key when clicking on Create`, you’ll get a duplicate of the existing record.
Why might you want a duplicate of a pre-existing record? Let’s consider an example, assuming you’re in the Beings table.
If you get information on several family members at once, and you’re sure that they aren’t already in the database, you can enter all the data for the kid, then hold down a modifier key and click Create` to create a duplicate record for the mom, where most of the info is already accurate and only a few things (like Personal Name or Sex) need to be changed. This saves you having to enter all that information a 2nd time. Then you can go on and do the same thing for dad and any other kids.
If you click on Create` when you’re in Find mode, trying to get a new request screen (to specify additional search criteria), you’ll get a reminder that that’s what the or` button is for.
Page 13: Delete` button
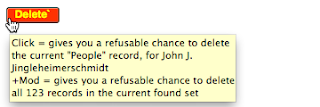
Clicking the Delete` button will display a dialog box asking you to confirm that you really do want to irreversibly delete the current record.
Good software design makes it hard to destroy data by accident, which is why FMP
- asks for confirmation before deleting and
- defaults to the Cancel (don’t destroy data) option.
If you click on Delete` when you’re in Find mode, you’ll delete the current request screen.
Page 14: In general, DON'T delete
It’s hardly ever a good idea to delete a record. Below we discuss some of the common occasions when you’re tempted to do so.
- What if somebody has died? Flag them as “deceased”.
- What if it’s a duplicate record? Yeah, that’s a bad thing, and you’ll need to delete 1 of the records, probably the newer one. But do it intelligently. Make sure that all of the info on the doomed record (particularly including links to or from other files) has been adequately transferred to the keeper record before deleting the doomed one.
- What about people who move without notifying you, and their mail bounces? Flag them as “Moved, left no forwarding address”.
- What if you just created a new record in error? OK, you can kill it quickly.
Don’t leave orphans. Instead, near the Obsolete field, click Set to indicate when the record became obsolete.

If you change your mind, click Clear to undo it.

You will have noticed that the label on the button changes depending on whether there's already a date in Obsolete. This is called being “context-sensitive”.
You should also have noticed that the check mark in Active goes out when you enter a date in Obsolete. If you clear the date, the check mark reappears. This lets you easily do a Find for active records.
Page 15: Find` button

If you click on the Find` button, you’ll go into FileMaker Pro’s generic Find mode, which lets you specify your own search criteria, as explained below.
If you hold down a modifier key when clicking on Find`, FileMaker does a Find All operation: It brings up every record in the current table. They won’t be sorted, and you’ll still be looking at whatever the current record was when you clicked the button.
To Find all people with a Family Name of Smith, enter Smith in the Family Name field.
To Find all people whose Family Name begins with S, enter S in the Family Name field. This would get you, for example, Suarezes and Swansons as well as Smiths. It would also get you Jones Smiths and Jones-Smiths.
If you enter information in more than 1 field, you will get records which match both criteria (for example, Family Name starts with S and Address includes Madison). This would get you, for example, Smiths from Madison.
After entering what you’re looking for in the proper fields, hit the enter key (on the numeric keypad), not the return key (in the alpha area). (On some keyboards, holding down shift while typing return is the equivalent of hitting the enter key.)
Page 16: Fancier finds
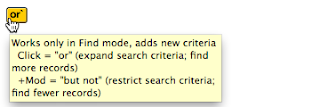
You can perform more sophisticated Find operations with the use of the or` button. It functions as:
- an or operator if you just click on it.
- a but not operator for a modifier key plus click.
Similarly, to Find names beginning with S except people living in Madison, enter the S 1st, then hold down any modifier key while clicking on or` and enter Madison. This would get you Suarezes from Milwaukee and Swansons from Green Bay but not Smiths from Madison.
Gold buttons are already set up to Find frequently needed subsets of data. For example, CurRec Finds the current record only.

Why might you want to do this? Suppose you wanted to print out just a single page of the screen you’re looking at. Clicking CurRec saves you having to specify Current Record Only or Pages 1 to 1 in the Print dialog box.
Page 17: Sort button

If you click on the Sort button, you’ll go into FileMaker Pro’s generic Sort mode, which lets you specify your own sorting criteria, as described below.
If you hold down a modifier key when clicking on Sort, you get exactly the same thing. (Notice there’s no accent mark.)

Green buttons are already set up to Sort via frequently desired sequences. For example, Name alphabetizes by Family Name + Personal Name + Middle Name + Ext.

Page 18: Navigation backward

Clicking on the |< button takes you to the first record in the current found set.

Clicking on the < button takes you to the previous record in the current found set. If you’re already at the 1st record, you’ll get a beep and a message saying so.
If you click on < when you’re in List View (more than 1 record visible at a time), you’ll go to the previous page, rather than the previous record.
If you click on < when you’re in Find mode, you’ll go to the previous request (if any).
Modifier keys have no effect on either of these buttons.
Page 19: Navigation forward

Clicking on the >| button takes you to the last record in the current found set.

Clicking on the > button takes you to the next record in the current found set. If you’re already at the last record, you’ll get a beep and a message saying so.
If you click on > when you’re in List View (more than 1 record visible at a time), you’ll go to the next page, rather than the next record.
If you click on > when you’re in Find mode, you’ll go to the next request (if any).
Modifier keys have no effect on either of these buttons.
Page 20: Navigation specified

Clicking on the # button takes you to the Nth record in the current found set, where you get to specify N.

Let’s say you’ve got 4214 records in the current table, you’ve found 97 of them, and you’re currently at the 1st one when you click on #. This is what you’ll see:
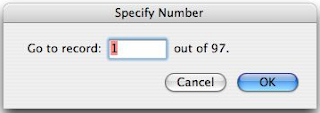
The number 1 is pre-selected for your convenience. If you want to go to, say, the 50th record in the current found set, just type 50 and press the enter key (or click OK).
Modifier keys have no effect on this button.
Page 21: Quit button

The Quit button closes all open FileMaker Pro files and quits (exits, stops, halts) the FileMaker Pro program (application).
Page 22: Other buttons
Right below the standard buttons on each data-entry screen — and also at the top of a lot of the output screens — you will see a variety of other types of buttons that let you do common tasks quickly.


Typically these buttons will appear alphabetically within each type.
Page 23: Additional powers
Occasionally you’ll see a button with a colored border. That means that, in addition to whatever the button's main color is telling you, it will also have additional powers signaled by the border's color.

A gray button means you’ll go to someplace else in the file; the purple border means you'll perform some action (like auto-entering a Subtitle or going into Preview mode) on the way there.

A gray button with a green border will take you to someplace else in the file and perform a Sort on the way there.

A gold button means you’ll do a Find; the purple border means it'll be followed by some action (like doing a Copy of whatever it finds).

A gold button with a green border will do a Find and then Sort the records it finds.
Page 24: Tag buttons
Often you will want to Find a collection of records that don’t have any permanent characteristics in common (such as people who will be carpooling to an upcoming event). That’s what the Tag box is for; such a checkbox occurs in almost every table and lets you flag temporary subsets of records for ad hoc purposes.
A common use of Tag is to do multiple Find operations, tagging the records found each time, so that you can later do a single Find for all of those tagged records.
You should normally clear all Tags prior to setting a new batch of tagged records, or you'll end up with taggees left over from the previous batch.

Clicking on the purple Tag button will put checks in the Tag checkbox for all the records in the current found set. (You can, of course, simply click in the Tag box directly for any given record.)

Clicking on the gold Tag` button will Find all of the tagged records in the current table.
As indicated by the accent mark and orange border, if you hold down any modifier key while clicking Tag`, you'll be offered a (refusable) opportunity to clear out the checks in that box for all the records in that table that are checked.
Because Tag is intended for temporary use, you should never assume that it's got the same stuff in it as it had the last time you used it. Somebody else may have subsequently used it for some other purpose.
Page 25: Omit` button
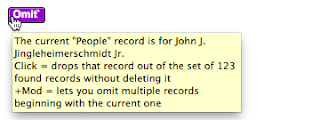
After you’ve done a Find, you may discover a record you didn’t really want. You needn’t do another, more detailed Find; instead, click on the unwanted record and then click the Omit` button. All this does is drop the current record out of the found set; it does not delete it!

For example, if you have 4214 records in your table and you’ve found 52 of them, clicking on Omit` would still leave you with 4214 total records, but now only 51 of them would be in your found set. Repeat as needed.
As indicated by the accent mark, if you hold down any modifier key while clicking Omit`, you'll be offered a (refusable) opportunity to exaggerate the normal effects of the button, here by dropping several sequential records out of the found set all at once.
Let’s say you’ve got 4214 records in the current table, you’ve found 52 of them, and you’re currently at the 14th one when you do a modified click on Omit`. This is what you’ll see:
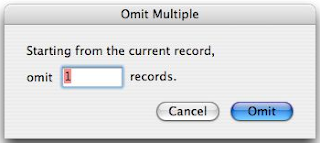
The number 1 is pre-selected for your convenience. If you want to drop, say, the next 12 records (14–25) out of the current found set, just type 12 and press the enter key (or click Omit).
Page 26: Button recap
Now that you’ve been exposed to all the buttons individually, it’s time for an in-context recap, showing them in relation to each other.
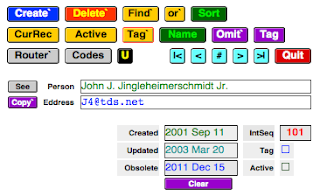
The exact sequencing varies from one installation to the next, depending in part on available space, but I do my best to keep everything in the same relative position within any given file.
Page 27: Standard info lines
Near the upper-right corner of each page is some information about the current status of the table you’re looking at:

These are the principal print orientations:

Just below the record numbers are the names of the table and the layout you’re looking at:

These lines are set up not to print. Also, you can’t enter them.
Page 28: Portals (windows into other tables)
As mentioned earlier, a typical database system comprises multiple tables, most of them linked to each other. For example, suppose that in the Beings table we’ve got a record for Kim Kent. Suppose further that Kim also has records in Electros, Members, and Receipts that are linked to the Beings record by means of a common code number called BeSeq (being sequence number).
We can peer into Electros etc. thru grid-like portals in Beings. More importantly, we can create new records (and edit existing ones) in those tables without ever leaving Beings. There are 2 different techniques for doing this:
Page 29: Data entry via portals
Technique #1: Just start typing! The example below shows this for Electros. Just click on the 1st line that doesn’t have text on it and start typing and tabbing. The new record, automatically linked to Kim Kent, is created in Electros. (Important: Technique #1 only works if you can actually see a textless line.)

See buttons enable you to jump directly to a related record. I try to have them going both ways. For example, the See button above would jump you from Kim Kent's personal record in Beings to the fax record in Electros, whereas the one below would jump you back to Kim's record.

Technique #2: 2-phase commit. This is what we do to create new records in the Receipts table. Think of it as loading your gun (Phase 1), then firing it (Phase 2).
Phase 1: Load. Make sure that the default values (top line) are the way you want them to be. These are the values that you want to have auto-entered in the next Receipts record you create.

Phase 2: Fire. Click the New button. The new Receipts record appears on the top line, using the default values you specified in Phase 1. (The reason it's the top line and not the bottom one is that I set up finance portals to sort from newest to oldest, so the most recent data are always on top, where they're easy to see.) You can still change those values right within the portal if necessary.

In some cases, you can tab out of the last default-value field (Paper No. in the above example) and right onto the New button. In this case, it will be highlighted as shown below. That means you can activate it without a click just by hitting the enter key.

Page 30: Standard colors
The numbers shown are hexadecimal codes in the format RRGGBB for the amount of red, green, and blue, respectively, in the indicated color.
009999 AQUA for auto-entered but changeable fields and navigation buttons
000000 BLACK for ordinary things
0000FF BLUE for manually entered values and the Create button
993300 BROWN for keyboard keys
CC9900 GOLD for Find buttons
888888 GRAYLIGHT for buttons jumping to data-entry screens
777777 GRAYMEDIUM for FileMaker modes and actions
666666 GRAYDARK for buttons jumping to output screens
008800 GREEN for calculated values and Sort buttons
FF00FF MAGENTA for field names
FF6600 ORANGE for the Delete button
7F007F PURPLE for action buttons
FF0000 RED for file names and the Quit button
FF3333 ROSE for table names
Nice post, Thanks for Sharing bro Download Tuxera NTFS 2018
ReplyDeleteDownload
Download
Download
Download
Download
Download
Download
FileMaker Pro Crack includes all the features of the FileMaker Pro 2021 license key plus many advanced features and enhancements for creating, managing, and discussing the directory.
ReplyDeletehttps://softwaregurucrack.com/filemaker-pro-crack/
I like your all post. You have done really good work. Thank you for the information you provide, it helped me a lot. I hope to have many more entries or so from you.
ReplyDeletefilemaker-pro Crack
archicad Crack
idevice-manager-pro Crack
I like your all post. You have done really good work. Thank you for the information you provide, it helped me a lot. You can Latest Software Crack Free Download With Activation Key, Serial Key & Keygen I hope to have many more entries or so from you. Download Crack Softwares Free Download
ReplyDeletefull latest version 2022 blog.
PreSonus Notion Crack
CLA-76 Compressor Crack
Ozone Imager Crack
1Keyboard Crack
4Front TruePianos Latest VST Crack
FileMaker Pro Crack
FileMaker Pro Crack includes all the features of the FileMaker Pro 2021 license key plus many advanced features and enhancements for creating, managing, and discussing the directory.
ReplyDeletehttps://topcrackfile.com/filemaker-pro-crack/
Thanks for sharing your knowledge to install & crack the Time Tables, but you need to update
ReplyDeleteit now. because there is a 2022 version available now:
procrack.co
easeus-mobisaver-crack
jetbrains-phpstorm
idm-crack
Great work you done.
ReplyDeleteFileMaker Pro Crack
I'm really impressed with your writing skills, as smart as the structure of your weblog.
ReplyDeleteAppreciation is a wonderful thing...thanks for sharing kepp it up.
Free Download Crack
Free Download Crack
Free Download Crack
Free Download Crack